After updating to Current Channel Version 1905 (Build 11629.20196) and higher, Outlook may hang at loading profile or won’t start. You may notice that if you open Task Manager that other Office processes are unexpectedly listed even though you did not open the application. If you end those processes it may enable Outlook to then open normally.
STATUS: FIXED
On June 25th, 2019, the Outlook Team made a change to the service to fix this issue. If you are still seeing this issue, restart Outlook a couple of times so it can pick up the service change.
WORKAROUND
To work around the issue, you will need to end all Office processes that are running and disable the presence features.
Ending processes in Task Manager
Right click on any space of the Taskbar and select Task Manager.
Under the Processes tab, locate all Office processes.
Select an Office process and then choose End task. Repeat this for each Office process listed.
Disable Outlook presence features
In Outlook, select File, > Options, > People
Uncheck the check boxes for the following options if they are enabled:
Display online status next to name
Show user photographs when available
Posted in365, Exchange, Office 365|Comments Off on Outlook won’t open or is stuck at loading profile
There are various methods to troubleshoot the Outlook 365 email inbox. You can use the following methods to force Outlook to update a mailbox:
Method 1: Check Internet Connection
Are you having trouble logging in to your Office 365 account or getting emails? Likely, it’s a problem with the internet connection. If you’re experiencing this issue, ensure you have a good connection and that your Outlook is up and running. Sometimes due to poor internet connectivity Outlook server can’t respond, and Outlook is stuck on updating inbox.
There are diverse steps you can attempt to fix the issue.
Restart Internet router: Unplug the router from the power outlet for thirty seconds and plug it back in. This action will reset the router and help you to deal with any networking problems.
Check cables: Check the cables going from the router to the modem and the cable from the modem to the wall outlet.
The internet connection is good, but you can’t access emails successfully. It may be because of an issue with your Outlook client. Now, we will discuss how to fix Outlook stuck on updating inbox using this different method. Additionally, some users face Outlook not automatically updating shared mailbox you can read this post and fix them.
Method 2: Disable the Antivirus Software
In some circumstances, Outlook conflicts with a third-party program, such as an antivirus, and may encounter issues. If your antivirus software is not Outlook-friendly, you face problems with Outlook. One of the many issues you could face is an outdated mail folder.
Be sure to read any instructions or warnings that are provided before disabling the software, as it can leave your system vulnerable to malicious attacks.
To disable the Antivirus Software – Open the software from the system tray (near the clock) or from the Windows Start Menu. From there, look for an option to disable or turn off the protection.
Note: If Outlook folders updating start, you can exclude Outlook processes, OST file and Outlook folder locations from the antivirus.
Method 3: Check Outlook Email Settings
Outlook Email Account Settings is an essential setting. That many users face a problem while trying to use Outlook. They can’t send or receive emails due to improper settings. It can cause a lot of problems, such as Microsoft Outlook stuck on updating inbox. It’s necessary to take some steps to fix this so you can continue using Outlook.
Launch the Outlook application.
Now, Click on the File option and then Account Settings.
Under Account Settings and again tap on Account Settings.
Here, you want to select the appropriate email account and click on Change.
Tap on the More Settings option.
Check and ensure that all email account settings are set up correctly.
A problem with Outlook Synchronization conflicts due to IPv6. This problem can occur when using a VPN or a different proxy server for sending and receiving emails. It is advised to disable the IPv6 address settings. And check if the Outlook 365 stuck on updating inbox is fixed or not.
Press the Window Key+R to open the run command box.
Now, type the Control and hit the enter button.
Click on the Internet and Network and Sharing Center.
Tap on the Change Adapter Settings>Ethernet or Wireless adapter.
Choose the Properties option.
Remove the tick from the Internet Protocol Version 6 (TCP/IPv6).
Hit the OK button.
Now, restart the Outlook application and check the Outlook update folders.
If Outlook stuck on updating this folder is not fixed. After applying this, you could try another method.
Note: IPv6 network settings refer to the configuration of a network device for IPv6 communication. This includes the IPv6 address assigned to the device, the default gateway address, and the subnet mask used to define the network. It also includes network settings such as DNS server addresses and router advertisements.
Method 5: Disable Cached Exchange Mode
When Outlook stuck on processing, this error occurs due to a server issue. However, to troubleshoot this error disable the Cached Exchange Mode, restart Outlook, and enable it again.
Start the Outlook program and click on the File>Account Settings>Account Settings option.
Select the Office 365 email account you want to change and click Change.
Remove or uncheck the tick from the Use Cached Exchange Mode option.
Hit the Next button and restart the Outlook program.
Note: Cached Exchange Mode is a feature of Microsoft Outlook. This allows users to work with their Exchange data offline. When it is enabled, Outlook stores a local copy of the user’s mailbox on the user’s computer, which is synchronized with the mail server when the user is connected. This allows users to access their mailbox data even when they are not connected to Exchange Server. When Outlook disconnected from exchange server, you can face the emails sending and receiving error.
Method 6: Repair the Microsoft Office Program
Open the Control Panel on your system.
Pick and Click on the Microsoft Office program from the programs list.
Opt for the Repair option and hit on the Continue button.
After successfully repairing the program, you can restart the system. and check the Outlook updating inbox stuck problem is fixed. If you want to know Focused Inbox in Outlook you can read this post.
Method 7: Create a Fresh Outlook Profile
Click on the Mail icon, then select show Profiles.
Now, tap on the Add button.
Give a profile name and hit the OK button.
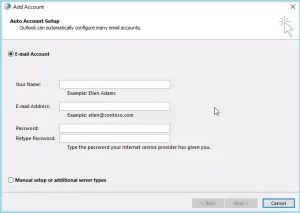
Under the Add account wizard, enter the Office 365 credentials.
Outlook will establish a connection to the server and begin the synchronization process. Check to see if all mail folders have been updated after the sync.
Note: Outlook Profiles is a storage file of the Outlook application. It includes the details of accounts, mail folders, rules, contacts, calendar settings, signatures, and other related information. Outlook Profiles allow you to move between several accounts. However, Outlook Folders Not Syncing on Windows due to corrupt Outlook file.
Method 8: Recreate the OST File
Hold the Window Key and Press R (Win+R). It opens the Run dialog box.
Enter the %localappdata%/Microsoft/Outlook and click the OK button.
You can click on your profile to locate the OST file location and choose the Open File Location.
Once the file has been found. Save the OST file somewhere on a system.
After that, delete the default O365 OST file.
Now, restart Outlook. It automatically creates a new OST file.
Outlook will synchronize all mail items after creating a new OST. Depending on your mailbox size, this may take some time to complete.
The above method can help to fix the Outlook stuck on updating inbox. It allows Outlook to update the Inbox and Outbox folder promptly. If Outlook PST cannot be found you can read this post.
Recreating an OST file is necessary when the original file is corrupted. There are a lot of reasons for corruption, such as system crash, virus attacks, or data loss. It allows users to recover and access their emails, contacts, tasks, and calendar events, eliminating the need to recreate these items individually.
However, you should check that all emails are backed up and accessible via the new OST file. You can utilize the OST Converter to convert OST files into PST format if any mail is missing.
Conclusion
Finally, we solved the problem of Outlook stuck on updating inbox errors. This error can occur due to email client, system, or being unable to access data from Outlook mailbox server due to issues with Outlook OST data file. If this occurs, users should take action to fix an Outlook updating inbox not receiving emails. However, our experts have already discussed the optimal way to update Outlook stuck mailbox.
Posted in365, Exchange, Office 365|Comments Off on How Do I Fix Outlook Stuck on Updating Inbox – A Complete Guide
Let’s Encrypt uses the client Certbot to install, manage, and automatically renew the certificates they provide. In the case where your certificate does not automatically renew on your Droplet, you can manually trigger the renewal at anytime by running:
sudo certbot renew
Copy
If you have multiple certificates for different domains and you want to renew a specific certificate, use:
certbot certonly --force-renew -d example.com
Copy
The --force-renew flag tells Certbot to request a new certificate with the same domains as an existing certificate. The -d flag allows you renew certificates for multiple specific domains.
To verify that the certificate renewed, run:
sudo certbot renew --dry-run
Copy
If the command returns no errors, the renewal was successful.
Posted inlets encrypted, My Linux|Comments Off on How can I renew Let’s Encrypt certificates
Permission Required – You need “Organization Management” permission to make the changes in the feature called “Mail flow”. You can use the Exchange Admin Center or Exchange Online Portal or Powershell to apply the disclaimer.
Position of the disclaimer – You can apply the disclaimer at the starting/top of the email i.e. prepend, or at the end/bottom of the message i.e. append. (Note: Generally, organisations apply the disclaimer at the end of the email.)
Step-By-Step Process
1) Open your EAC or Office 365 Admin Portal. On the sign-in page provide your admin credentials.
2) Within EAC, click on Mail Flow.
3) In the Mail Flow Page, click on the “Rules” tab, then click on the “Add+”, and then click “Apply disclaimers”.
4) In the “New Rule” window do the following. In the “Name” field, enter a unique name of the rule. In the example, I have given the name “01-Disclaimer”.
In the “Apply this rule if” field, select the conditions for displaying the disclaimer. In the example, I have selected the “The sender is located” condition, and then select “Inside the organization”. I want the disclaimer on every email to send within the organization or outside the organisation. You can use your logic as per your organisation need or compliance.
In the “Do the following” field, select Enter text to enter your disclaimer. In the given example, I have entered the below-formatted text. Note: You can add simple plain text as well as formatted text. It supports HTML formating.
<p style=”font-size:10pt;text-align:justify; line-height:10pt; font-family: ‘times roman’;”>The information contained in this electronic message and any attachments to this message are intended only for the individual(s) addressed in the message and may contain proprietary and confidential information. If you are not the intended recipient, you should not disseminate, distribute or copy this e-mail. Please notify the sender destroy this message. WARNING: Computer viruses can be transmitted via email. The recipient should scan this email before open it. The company accepts no liability for any damage caused by any virus transmitted by this email. </p>
Now, we have to mention the audit and severity levels. We need to assign the severity level that appears in the mail message logs. In the example, I have selected “HIGH”.
Then, select the mode for the rule. Select Enforce to turn on the disclaimer immediately.
Now, with “More Options” at the bottom, you will get additional conditions or exceptions that you want to add. Like, restrict multiple disclaimers being added in an email conversation or you want different disclaimers for internal and external users or any exception for any specific departments etc. You can explore the additional conditions or exceptions based on your organisation requirement.
When you’re done with editing, click on Save.
Click on the Yes to apply the Disclaimer rule.
Now, the rule is showing in the Rules tab as shown below.
Below is the Disclaimer in the Plain Text.
Disclaimer with Formatting.
Posted in365|Comments Off on Step-By-Step : How to configure email disclaimers in Office
Click OPTIONS in the top right corner of Outlook Web App (OWA)
Click SEE ALL OPTIONS
Use the MAIL > OPTIONS menu at the top left to change from MANAGE MYSELF to MY ORGANIZATION. If you don’t see this option, you are not signed in with an Admin account.
Click MAIL CONTROL in the menu on the left
Click RULES (although you are likely defaulted their already)
Click the NEW button
Select: If THE SENDER IS IN THE SCOPE OF and set it to INSIDE THE ORAGANIZATION
Click the ADD CONDITION button
Select THE RECIPIENT IS IN THE SCOPE OF and set it to OUTSIDE THE ORGANIZATION
in DO THE FOLLOWING, select APPEND A DISCLAIMER TO THE MESSAGE, type in your footer text and set the fallback action to IGNORE
Copy some unique part of the footer text
in EXCEPT IF select THE SUBJECT OR BODY MATCHES and paste in the unique part of the footer text (from step 12)
name your rule and click the SAVE button at the bottom.
Posted in365, Exchange|Comments Off on Add a Global Footer To Hosted Exchange on Office 365